Photogrammetry vs 3D scanning for creating a 3D model
The process of creating a 3D model starts with choosing the right tool for the job, and this choice primarily revolves around what you need the 3D model for – in other words, how you’re planning to use it. Some of the most popular tools include 3D scanning and photogrammetry, and this article is here to guide you as to which one of them to pick for a specific project, as well as when they can be combined.
3D scanners
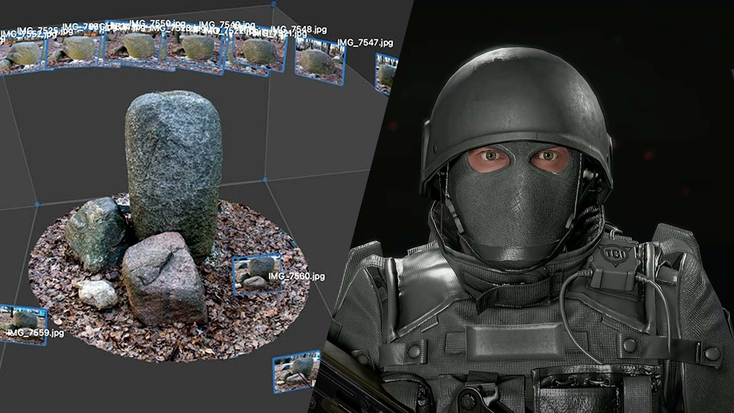
A 3D model created using photogrammetry (left) vs. a 3D model created using 3D scanning (right).
For starters, let’s touch upon how 3D scanning works, and we’ll also profile the main types of 3D scanners available on the market. This will be of help later, when we move on to comparing this technology with photogrammetry.
3D scanning is a technology that brings physical objects, or to be more precise, information about their shape and oftentimes color, into the digital world. Once you have a digital replica of an object on your computer, a myriad of possibilities open up to you: it can be inspected, measured, modified, put through simulations or stress tests, shared, collaborated on, imported into AR/VR environments – you name it.
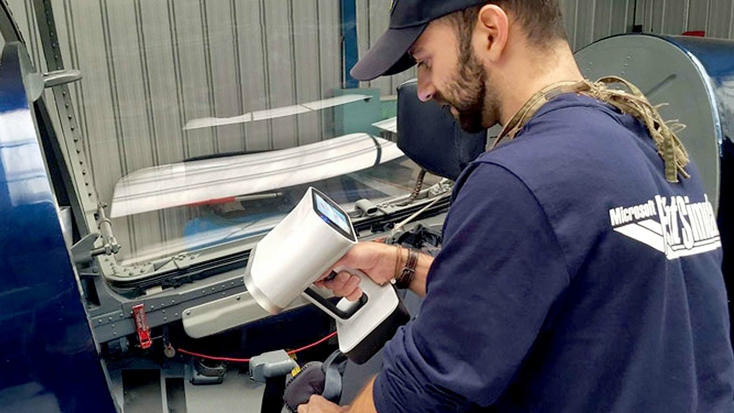
Submillimeter-precise capture of aircraft parts with the Artec Leo 3D scanner.
Key point
3D scanning is increasingly being used to inspect, measure, and digitize objects in the industrial, medical, automotive, CGI, aerospace, and archeology sectors, among many others.
How do you obtain a precise digital replica of an object? The short answer is: with a 3D scanner. The landscape of 3D scanning tools has been rapidly changing over the past few decades as traditional, tried-and-tested technologies evolve and new ones are developed from the ground up. As of now, the most widely used 3D scanning tools are structured-light and laser triangulation scanners.
Structured-light and laser triangulation 3D scanners
The mechanics of these devices are very similar: the scanner projects light onto the surface of an object, and the scanner’s camera records how the beam of projected light is distorted as it is reflected from the surface. The difference here is that structured-light scanners send out beams of white or blue light that form a grid, and laser triangulation scanners emit simple lines.
During scanning, the 3D scanner gathers information about millions of points of the object’s surface, and the scanner’s software analyzes the aforementioned distortions and positions all the points relative to each other, thus reconstructing the shape of the object in the digital environment.
With both structured-light and laser triangulation methods, the 3D point dataset is called a point cloud, and this can be converted into a 3D mesh model. Depending on the program used to make this mesh, its topology can be made up of triangular or quadratic faces, but either way, models consist of millions of these joined together. Conversion is performed to facilitate further work with the digital replica of the object for reverse engineering, CAD, AR/VR, and more.
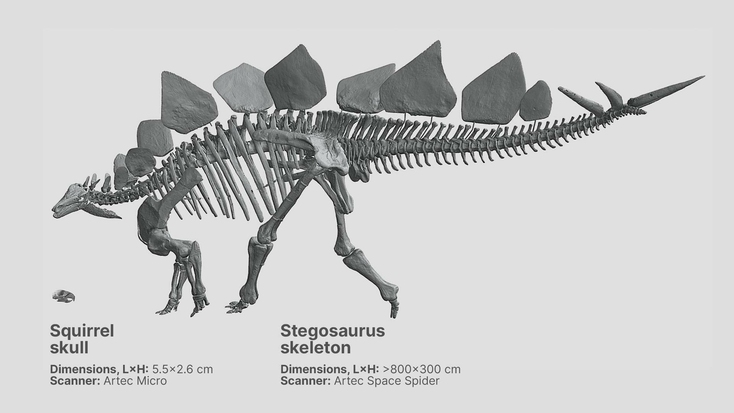
Professional 3D scanners and software give you the power to reconstruct just about any real-world object in digital form with astounding levels of accuracy.
Structured-light and laser 3D scanning technologies prove particularly effective when you need to scan a relatively small object: from a few millimeters to a few meters in size. With handheld 3D scanners, this process is ultra-fast, and the final 3D model will be highly precise and exceptionally faithful to the original.
Time-of-flight 3D scanning technology
When the size of the object (either its height or length) exceeds several dozen meters, you might want to opt for a 3D scanner that’s based on time-of-flight (TOF) technology, also called pulse-based laser 3D scanning technology. Such scanners can be described as long-range: unlike structured-light and laser triangulation scanners, the distance between a TOF scanner and the object can range between several meters to several hundred or even thousand meters.
Key point
Structured-light, time-of-flight, and laser triangulation 3D scanners offer a level of versatility and real-time feedback that can’t currently be achieved with photogrammetry.
How does this technology work? The scanner emits laser pulses. As they are reflected back from a surface, they are picked up by the scanner’s receiver, and the scanner calculates the time (fractions of a second) each pulse took to return. Collecting and recording information about the millions of pulses bounced back, the scanner forms a picture of a surface. The accuracy varies depending on the solution used and the area to be digitized. If you’re scanning a building with a stationary, tripod-mounted 3D scanner, expect it to deliver scans accurate down to just a couple of millimeters; if you need to map a large area of terrain and you’re scanning it from an airplane or UAV, your tolerances may reach several centimeters.
Pros & cons of 3D scanners
As you can conclude from the first part of this article, structured-light, laser triangulation, and TOF scanners can all deliver precise digital replicas of relatively small objects or large surface areas. The accuracy of the spatial data provided by quality 3D scanning solutions makes them indispensable tools in fields where an accuracy error can lead to irreversible consequences or even a disaster. 3D scanners are relied upon in industrial design and engineering, where high-profile specialists use them for a wide range of purposes, for instance, to develop electronics, ensure the stable operation of pipework, and inspect the quality of mass-produced mechanical parts.
In healthcare, applications of 3D scanners vary from designing customized prosthetic devices and implants that fit perfectly and last for years to assessing the results of plastic surgery, both pre-op and post-op. In the arts, entertainment, science, and museums, 3D scanners help create digital doubles of actors, digitize million-year-old fossils at excavation sites and museum repositories, and advance research in spheres such as anatomy, paleontology, and even space exploration. Last but not least, more and more forensic anthropologists are turning to 3D scanning as the fastest and most accurate way to document crime scenes.
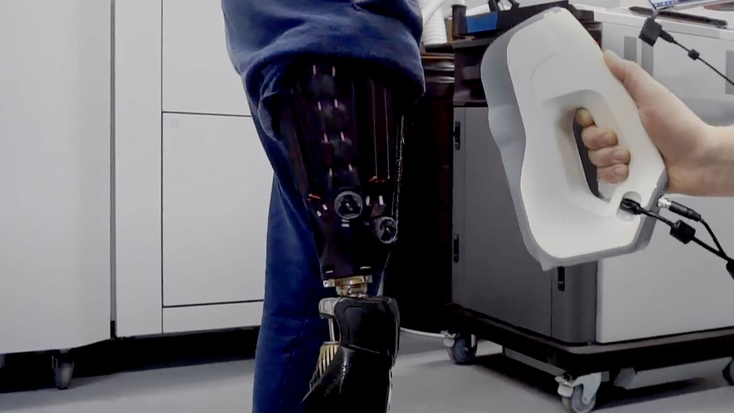
Artec Eva is widely used to create high-performance custom prosthetic devices.
In addition to these versatile applications, 3D scanners are distinct for their ease of use. Handheld scanners, for instance, are lightweight devices that you can walk around an object with, capturing every part of the surface. The most advanced of these 3D scanners are all-in-one solutions: they have an inbuilt touchscreen so you can track scanning progress in real time on the scanner’s display, without the need for a laptop or tablet. Having no laptop or tablet also means you can move around the object freely, unhampered by cables or wires.
The real-time feedback provided by these screens is also invaluable for users, as it helps them quickly and easily understand if they’ve captured every area of an object. We’ll delve further into the pros and cons of photogrammetry soon, but it’s worth noting that this is a distinct advantage of 3D scanning with a built-in screen – you instantly know what data you’ve accumulated and what you’re missing.
Key point
Today’s cutting-edge handheld 3D scanners feature displays that provide you with real-time feedback – so you no longer have to run cables to monitors to check your progress.
Additionally, as mentioned early on, 3D scanners capture the object’s shape, and some of them can also capture its color, or texture, as it is known in the world of 3D scanning. While accuracy is 3D scanning’s undeniable trump card, these results can be further enhanced with the vividness photogrammetry can provide.
Photogrammetry
Photogrammetry is a technology that delivers object 3D models by combining multiple photos of it. Unlike the professional 3D scanning technologies described above, photogrammetry requires no 3D scanner. What you need to generate photos is… yes, a camera. It doesn’t need to be a specialized piece of gear either, so you can complete the process using pictures taken with anything from a handheld smartphone to a drone. 2D camera shots are processed by photogrammetry software, with many factors taken into account, primarily the camera’s focal length, lens distortion & resolution, positions and angles of the camera when shooting the object, as well as having a sufficient field of view of the camera and overlap between the photos of adjacent areas.
Photogrammetry software
If we rule out free apps, which are not always conducive to quality results, while offering limited to no support, as well as a meager selection of processing/editing tools, then there are two major brands in this industry: Reality Capture and Metashape. The former is distinct for a more flexible and intuitive workflow, offering a number of pathways to choose from when you need to modify original data. You can download Reality Capture for free and have the software assemble a 3D model for you.
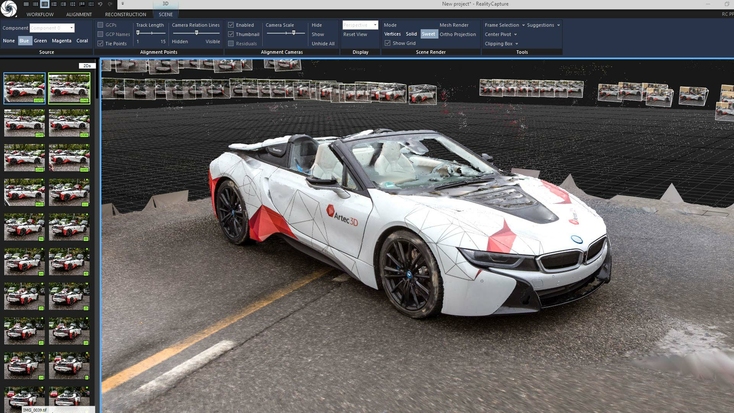
A photogrammetry project in RealityCapture.
You can then see if it looks good enough for your needs, and if it does, you’ll be allowed to download the 3D model for a fee. In addition to this, RealityCapture performs calculations up to 10 times faster than its main competitor. On the other hand, one advantage of Metashape is its unfaltering support and extensive user community, from which you can solicit advice and help if needed. You’re offered loads of training materials and access to an impressive gallery of 3D models. Many users also believe that Metashape ensures higher accuracy compared to RealityCapture.
For those seeking other options, 3DF Zephyr and Meshroom continue to improve on their already strong photogrammetry feature sets. Elsewhere, Colmap – a free solution initially developed for research – offers a stripped-back, budget-friendly alternative.
Pros & cons of photogrammetry
One big advantage of photogrammetry is that the cameras used for it are affordable. Nowadays, smartphones feature 16 MP cameras, which are more than capable of taking images with enough color resolution for photogrammetry. Like 3D scanning, photogrammetry is a non-contact method of digitizing an object. Photogrammetry hardware devices, whether they’re professional cameras or smartphones, are lightweight and portable, and do not require any training to be used. Unlike 3D scanning, you don’t really need to pick the right tool (camera) depending on the size of objects you may need to scan. A camera can be used for both tiny and large objects.
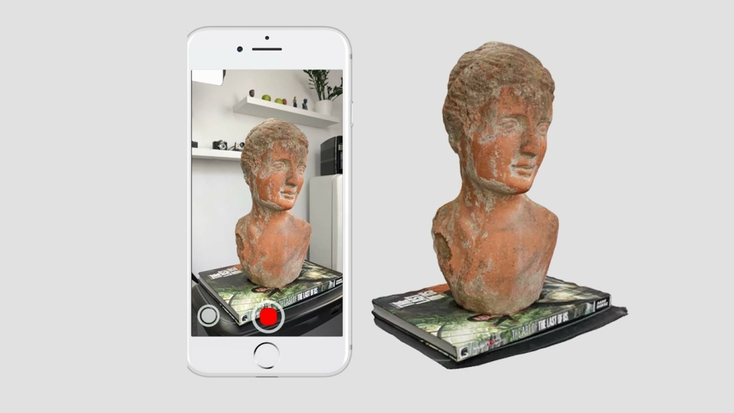
Photogrammetry allows you to take photos of objects around you and convert them into lifelike 3D models. Image source: 3dscanexpert.com
Naturally, the higher the quality of the shots, the better the quality of the final 3D model built from them. A key factor that plays a vital role in creating a no-gap 3D model is whether the shots you’ve taken cover the entire surface area of the object. You should brace yourself for having to manually take dozens to hundreds or even thousands of shots if you aim for better results. Compare that to the instant, automatic 3D data capture performed by a 3D scanner. This leads us to another limitation of photogrammetry: in the vast majority of cases, it’s not practical for creating 3D models of people unless your model can sit still for many minutes or even hours.
Likewise, photogrammetry is much more difficult to deploy on-location, especially if you’re planning on using a booth-based setup. For instance, if you’re scanning in a remote area like the middle of a field, it’s going to be very tricky to use a bulky booth there. If you’re scanning people that aren’t co-located, it’s also much easier to ship a 3D scanner to them, than a complicated multi-camera arrangement.
You might also want the object to be evenly lit as you photograph it. Otherwise, you might spend days fixing/adjusting the brightness of many of the shots afterwards. This is a common issue when taking photos of an object in an open-air location on a sunny day: the sunlit side will appear to be brighter than the shadow side.
So, ideally, you should pick a cloudy day for your photoshoot. If you find that some of the parts of the surface fail to come out well enough during the processing stage, you’ll have to return to the site where the original photoshoot took place and recreate the conditions of that first photo session, including the lighting. You’ll be lucky if you manage to add new photos to the original database. Chances are, however, that you might need to re-shoot the entire object or scene once again.
You can get around some of photogrammetry’s limitations by investing in an artificial light source, and equipping this and your camera with polarizing filters. Such cross-polarization setups reduce the amount of an object that is obscured by reflections during photoshoots, resulting in more detailed photogrammetry models. One downside to the process is that it means having to acquire polarization gear, making capture sessions more expensive. It isn’t foolproof either, as if your polarizers aren’t made from the same material, this can cause color shifts that distort the appearance of models.
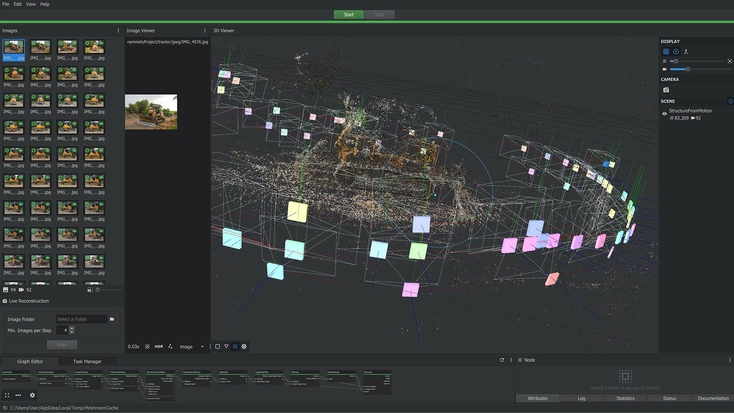
A photogrammetry project in Meshroom.
Ultimately, unlike 3D scans, which provide accurate linear measurements, the scale and proportions of the object are likely to be distorted with photogrammetry. This is due to the technology’s reliance on input image quality, which can be impacted by issues ranging from lighting to resolution and motion blur. As the final model is assembled in abstract units, it can’t be used in applications that require high accuracy either, such as reverse engineering or quality inspection.
Key point
Limitations from portability, vulnerability to changeable conditions, and accuracy of photogrammetry equipment make it less suited to certain applications than 3D scanning.
How to combine the best of the two worlds?
In quite a few cases, you might want your 3D model to be both as accurate as possible and rendered in true-to-life colors. That’s where you can consider combining 3D scans with photos.
This exact approach was used to create the first-ever 3D portrait of a head of state, then President Barack Obama. For that project, a structured-light scanner (Artec Eva) was used in synergy with photogrammetry. As we now know, photogrammetry is tricky to use when you need to make a 3D model of a person, especially when we’re talking about a president, who’s always on a tight schedule. The workaround here was taking simultaneous shots with as many as 80 cameras mounted on a special scaffolding around the president. This way, all the colors, shades, and hues were picked up in the shortest time possible, and Artec Eva ensured that the shape of the head was captured with utmost accuracy.
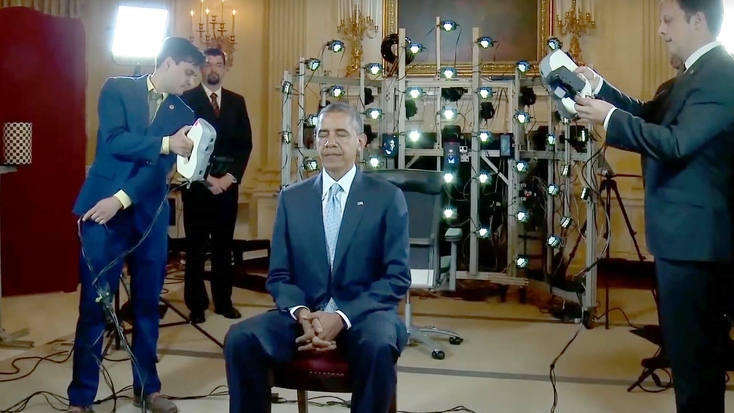
Barack Obama being scanned with Artec Evas for the first-ever 3D portrait of a head of state, with a photogrammetry set-up seen in the background. Image source: whitehouse.gov
In another case, combined datasets were used to 3D model an entire car. For this project, the tetherless Artec Leo captured the geometry of the car (both the car’s body and its interior design). Accurate information about the geometry would suffice for industrial designers and engineers. However, in industries such as video game development, vivid colors often play a greater role than the accuracy of the car’s aerodynamic profile, so a game developer might want to superimpose color camera shots on the 3D mesh model. This way, when integrated into a video game, the car will look entirely lifelike, which will make for a far better user experience.
On the software side of things, it’s also worth noting that Artec Studio now makes it easier than ever before to combine 3D scanning and photogrammetry. Alongside scan data capture and processing features, the program packs a photo registration algorithm that allows users to apply textures from high-resolution photos to models. In many cases, this helps improve color clarity and makes scans appear more realistic.
One such case has seen Artec Studio’s joint 3D scanning-photogrammetry functionality deployed to digitize a chair featuring intricate jungle-inspired patterning. Photos were combined with Artec Leo scan data to create texture files, which in turn, were mapped to a 3D mesh using the program’s texturing algorithm. Alongside this crisp, vibrantly colored chair model, the feature has also been used to wrap 140 high-res images of a Nike sneaker around high-resolution 3D scan data, captured with Artec Space Spider.

The stunning Nike sneaker in full-color 3D.
The result of the process, which took just over half an hour to complete, was an incredibly lifelike scan of the Nike Kyrie 7 basketball shoe. This model of the famous footwear featured a highly textured replication of Nike’s 360-degree traction insole, which was scanned by placing the sneaker upside down to avoid creasing. In a similar project, sports brand ASICS has used photo-texturing to create ultra-realistic footwear models for quality inspection and innovative animated marketing content. Each of these initiatives demonstrates the lofty level of detail that can be captured when Artec hardware and software are combined.
Key point
You can now get the best of both worlds, by combining 3D scans with photogrammetry data via Artec Studio, and generating models that feature incredibly lifelike textures.
Conclusion
Photogrammetry remains popular among video game developers, who value its ability to create stunning visuals. However, 3D scanning is making gains in this area, as a much faster and more versatile way of digitizing real-world objects and people. Handheld 3D scanning also continues to gain traction in areas like healthcare, where rapidly and accurately measuring patients’ extremities, is increasingly allowing for the creation of custom, better-fitting orthotics.
As such, if precision is your top priority, you want to quickly capture objects in high resolution, and you plan to further use your 3D models in CAD applications, then you should also go for a professional 3D scanner and 3D scanning software.
Assuming you have an unlimited budget and are in no rush to get the job done, the combination of 3D scanning and photogrammetry for converting real-world objects into their digital replicas is often ideal. This way, your model will feature both highly accurate geometry and a realistic, detailed texture with vivid colors.
Read this next
More from
the Learning center
Photogrammetry is the process of taking reliable measurements from photographs. It has been with us in some form for centuries and has helped shape our understanding of things like the Earth’s surface. Today, it plays a vital role in many industries. So here is a primer to give you a general understanding of what it is, and how it works.
In recent times, the entry barriers that once made photogrammetry inaccessible to most – mainly price and available technology – have eased considerably. This has paved the way for more widespread adoption, incentivizing the development of better, more capable, and user-friendly software. Here, we take a look at what’s available. We talk compatibility, pricing, pros and cons, and some important details to help you get the lay of the land if you’re looking to find a solution for your photogrammetry needs.
Over the last decade, character models and environments in CGI and video games have come on leaps and bounds, not just due to hardware upgrades, but the adoption of digitization technology like photogrammetry, which turns photos and videos into beautiful 3D models. In the following article, we lift the lid on the topic, covering everything from workflow steps to the prospect of using 3D scanning as an alternative.


